"Or how to create your own hardware cracking resources"
By
[ MONITORING HARDWARE PORT
ACTIVITIES USING EXTERNAL DEVICES ]
"Or how to create your own hardware
cracking resources"
By ![]() Black Fenix
Black Fenix
In this tutoial we're going to build a sort of
"spy" device, later we'll plug it to the paralel port. The original design is
from Virgilio Gómez but I've modified it a bit. This "spy" has multiple
functions, but I'm going to use it for a curious purpose.
The "spy" function is: check if the port works correctly, monitor any activity
by switching various LED's on and off. This will be useful to monitor any dongle activity
(see my generic essay on dongles), while we're debugging programs we will know if the
calls that we're tracing sent some info to the dongle (the LEDs will tell us 8) )
With this help we'll speed up the location of the implied calls, after that we'll concentrate our efforts in this calls trought a more deep code analisys, whitout needn't to trace all the previous calls that has nothing to do with the dongle.
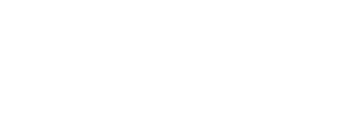
The circuit scheme is quite simple, but before we're going to take a look at the DB-25 connector pinout, just to increase our knowledge a bit.
| Pin | I/O | Active polarity | Description |
| 1 | Output | 0 | Strobe |
| 2 ~ 9 | Output | - | Data lines (bit 0/pin 2, bit 7/pin 9) |
| 10 | Input | 0 | Acknowledge line (active when the remote system takes data) |
| 11 | Input | 0 | Busy Line (if active, the remote system does not accept any data) |
| 12 | Input | 1 | Out of paper line (if active, the printer is out of paper) |
| 13 | Input | 1 | Select line (if active, the printer is selected) |
| 14 | Output | 0 | Autofeed Line (if active, the printer inserts a new carriage return for each new line) |
| 15 | Input | 0 | Error line (if active, there is a printer error) |
| 16 | Output | 0 | Init line (if active during 50 micro-seconds, the printer will be initialized) |
| 17 | Output | 0 | Select input line (if active, the forces the printer to stay out of line) |
| 18 ~ 25 | - | - | Ground |
Well, you see that there is no need to monitor all the pins,
with the first 8 data lines we'll have enough (mode SPP standard). If we've got 8 data
lines (1byte = 8 bits), we'll need one LED for each bit, this leads to a total of 8
LEDs. This LEDs will need some power to work, we're not going to use the low power that
flows trought the port cos isn't enough for our purposes and we don't wanna spend to much
money in low consume components. Thus, with a 5V power battery we'll have enough. We'll
obtain this voltage from a 9V battery, later we'll reduce this to 5V with the help of and
integrated.Also we'll use another integrated 74LS244, this one will work as a voltage
separator, preventing any posible damages to the paralel port.
|
|
|
Once you've build the circuit, you must check that it works fine, connect it to the 9V
battery and check that all the LEDs are ON. This is correct, cos while the data lines
aren't being connected to ground, the LEDs will rest ON. Checking that everything is
correct, plug the "spy" to the paralel port (i. e: LPT1 address 378h) and power
on your computer. If everything goes right, you'll see that the LED goes OFF and while the
computer boots (not the OS, the BIOS), you'll see the LEDsd flashing from time to time
(this is good, coz the BIOS is sending data to the port and our "spy" is
trapping it :) )
If you don't notice any activity, test that you've the port enabled, enter the BIOS and
modify the option (check you motherboard manual if you don't know how to do this).
To check that all the LEDs work well , we can use SoftIce.Press Ctrl+D and enter the
following commands.
o 378 0 -> switch OFF all the LEDs binari value 00000000
o 378 FF -> switch ON all the LEDs binari value 11111111
o 378 1 -> switch ON first LED binari value 00000001
o 378 2 -> switch ON second LED binari value 00000010
o 378 4 -> switch ON third LED binari value 00000100
o 378 8 -> switch ON fourth LED binari value 00001000
o 378 10 -> switch ON fifth LED binari value 00010000
o 378 20 -> switch ON sixth LED binari value 00100000
o 378 40 -> switch ON seventh LED binari value 01000000
o 378 80 -> switch ON eigth LED binari value 10000000
I must say that this circuit it's very simple
and could be improved in a lot of aspects:
- Allow data output and input , this will allow us to work with the dongle plugged.
Monitor dongle responses, with green LEDs or other color.All this stuff implies
bi-directional comunications.In ASCCI:
PC <-----> spy <----> dongle or another device
- Trap dongle responses and send (duplicate) them to another port. This port we'll be
listened by a software that will transfer the responses to a file. This would be a good
advance, and we will be able to do a dongle emulator with the received data.
- Increase data lines (LEDs) if needed.
I think that all this could be done, we only need to know a bit more about electronics,
could somebody tell me how to acomplish that ? I've got a vague idea, but I don't know
wich components are needed and how to connect them.
That's all, you see, how we must call this? plug-&-crack technology perhaps. :)
I must thank you all the people who helped me, either wih material or with advices on how
to do this.
 You are inside Reversed Minds pages. por |